前言
自从一年期免费的 1Password 到期以后,就萌生了转投别家的想法。对比了一下市场上现有的密码管理软件,发现 Bitwarden 不管是价格还是跨平台支持上,都胜于别的管理软件,所以决定切换到 Bitwarden 并且自己搭 Bitwarden 的服务器。
工具
- 一台 VPS 主机
- 一个域名
- SSL 安全证书
安装 Docker CE 和 Docker Compose
安装 Docker CE
1 | sudo apt-get update |
安装 Docker Compose
1 | sudo curl -L "https://github.com/docker/compose/releases/download/1.25.5/docker-compose-$(uname -s)-$(uname -m)" -o /usr/local/bin/docker-compose |
检测 Docker CE 和 Docker Compose 是否安装成功
1 | #有输出即表示成功 |
安装 Nginx
由于后面需要用到 Nginx 做反向代理和 Let’s Encrypt 为网站添加 SSL 证书,所以也要提取为服务器安装 Nginx
1 | sudo apt-get update |
配置域名解析
Bitwarden 服务需要用到域名作为服务入口,所以需要把域名的 DNS 解析到服务器上
在 DNS 设置中,删除所有的现有的 DNS 设置,然后添加两条新的记录

把第一行的地址改成 VPS 主机地址,第二行的地址改成域名的地址,保存即可
修改域名 DNS 记录之后需要 15-30 分钟时间生效,在等待期间,可以为网站配置 SSL 证书
添加 SSL 证书
这里使用的是 Let’s Encrypt 的服务来为域名添加 SSL 证书,证书的有效期为三个月,三个月后会自动续期
首先安装 snapd
1 | sudo apt update |
验证是否安装成功
1 | sudo snap install hello-world |
然后安装 Certbot
1 | sudo snap install --classic certbot |
测试自动续期
1 | sudo certbot renew --dry-run |
安装 Bitwarden_rs
Bitwarden_rs 安装只需要一行代码就可以
1 | docker pull bitwardenrs/server:latest |
启动 Bitwarden_rs
1 | #8880端口可以改成任意端口 |
配置 Nginx 反代理
代理文件在/etc/nginx/sites-enabled/default,在 server 里添加下面的配置,并且在文件里没有多余的 location /,如果有前面添加#
1 | add_header Strict-Transport-Security max-age=15768000; |
重启 Nginx
1 | sudo systemctl reload nginx |
刷新一下浏览器,你可以看到 Bitwarden 可以正常访问了
禁止注册
为了保证 Bitwarden 服务器的稳定,在自己注册完以后,可以禁止注册新用户
关闭 container
1 | docker stop bitwarden |
重新启动新的 container
1 | docker run -d --name bitwarden \ |
升级 img
1 | #获取最新的版本 |
配置 Docker Compose
这一步不是必须,只是为了更方便管理 docker
首先在/bw-data 相同的目录下创建 docker-compose.yml 文件
1 | nano docker-compose.yml |
然后写入以下配置,更多配置请参考官方文档
1 | version: "3" |
运行服务
1 | docker-compose up -d #运行服务 |
使用 Bitwarden
由于是自己搭建的服务器,所以在登录的时候需要添加自己服务器的地址,否则使用的是官方的地址
点击左上角的齿轮

然后输入自己的域名

建议开启两步验证,位置为设置 - 两步登录
数据备份
由于密码的特殊性,需要定时执行 bitwarden 的备份,这里用到了 Linux 服务器自带的 Crontab 定时任务来定时为密码文件做备份
新建备份文件夹
1 | mkdir /bw-data/db-backup |
编辑 crontab 任务
1 | crontab -e |

执行备份的代码
1 | sqlite3 /bw-data/db.sqlite3 ".backup '/bw-data/db-backup/backup.sqlite3'" |
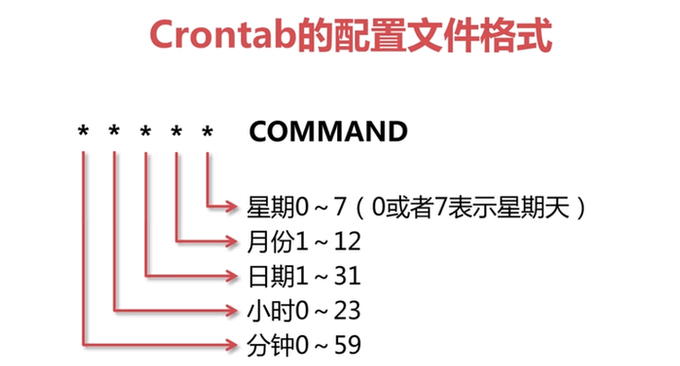
Crontab 定时任务例子,请根据自己的需要选择任务并把 command 替换成上面的备份代码
1 | #每分钟执行一次 |
恢复备份
恢复备份的方法很简单,可以使用cp指令直接把备份文件夹中的 sqlite 文件复制并替换到原来的文件即可
1 | #example |
网络备份
本地备份只能防止数据出错,有恢复的余地。但是一旦服务器宕机,或者是无法连接,数据就取不出来了,这样就麻烦了。所以我们可以考虑使用对象存储备份到云服务器上,即使服务器宕机也可以把数据轻松下载下来。
对象存储服务有很多,七牛云对象存储 Kodo,阿里云 OSS,腾讯云 COS,Amazon S3,根据自己的需求选择
各存储服务对比
| 对象存储 | 价格 | 免费额度 | 其他 |
| :—————–: | :————: | :————————————————————: | :—: |
| 七牛云对象存储 Kodo | ¥ 0.099 元/GB/月 | 每月 0-10GB 免费 |需要绑定已备案的域名,免费测试域名 30 天失效,失效后无法取出文件 |
| 阿里云 OSS | ¥ 0.12 元/GB/月 | 新用戶认证后免费试用 100GB 1 个月
香港或海外服务器 5GB 免费额度 | |
| 腾讯云 COS | ¥ 0.099-¥ 0.118 元/GB/月 | 新用户免费 50GB 额度 6 个月 | |
| Amazon S3 | $0.023 刀/GB/月 | 5GB 空间 12 个月 | |
七牛云对象存储
七牛云使用 qshell 作为上传工具,下载地址。 下载后解压并重命名为 qshell,没有后缀。然后使用 ftp 上传到服务器要执行该命令的用户目录里,地址是/home/xxxxx/,xxxxx 为主机用户名,一般 home 文件夹内只有一个用户名的文件夹,上传到里面即可。
给 qshell 授权,授予 qshell 运行权限
1 | chmod a+x qshell |
配置 qshell 的 access_key 和 secret_key
1 | ./qshell account access_key secret_key xxxxx |
完成后检查是否添加成功
1 | ./qshell account |
qshell 配置文件
在 qshell 的同一目录下创建一个配置文件,命名为 upload.conf,然后根据下面的配置文件进行修改
记得修改 bucket 的名字,就是你在对象存储里新建的存储空间名字
1 | { |
上传备份
1 | ./qshell qupload upload.conf |
同样可以利用 crontab 来设置定时任务,但是需要配置$PATH 环境变量
根据你所使用的 bash 锁对于的配置文件的不同,写入位置也不一样
如果是/bin/bash,那么就是/.bashrc 文件,如果是/bin/zsh,那么就是/.zshrc 文件中。
写入的内容为
1 | #xxxxx为/home下面的用户名文件夹的名字 |
然后可以通过两种方式立即生效,其一为输入 source ~/.zshrc 或者 source ~/.bashrc 来使配置立即生效或者完全关闭命令行,然后重新打开一个即可,接下来就可以在任何位置使用 qshell 命令了。
设置完$PATH 以后,corntab 定时任务的代码为
1 | #每周一上传一次,如需更改时间,参考前面的crontab设置 |
阿里云对象存储 OSS
阿里云的配置方式与七牛云差不多,只是使用的工具不同
下载ossutil,ossutil 不需要使用到 ftp,可以直接在 bash 里操作
1 | wget http://gosspublic.alicdn.com/ossutil/1.7.0/ossutil64 |
修改文件执行权限
1 | chmod 755 ossutil64 |
使用交互式配置生成配置文件
输入配置命令
1 | ./ossutil64 config |
根据提示设置配置文件路径。
建议直接按回车使用默认配置文件的路径。
1 | Enter the name of the configuration file. The file name can contain a path. The default path is /home/user/.ossutilconfig. If you press Enter without specifying a different destination, the file is generated in the default path. If you want to generate the file in another path, set the --config-file option to the path. |
根据提示设置工具的语言。
1 | Enter the language: CH or EN. The default language is EN. This parameter takes effect after the config command is run. |
设置 Endpoint、AccessKey、STSToken 参数。
1 | 请输入endpoint:Endpoint |
上传代码
1 | #把xxxx替换为阿里云创建的bucket的名字 |
crontab 定时任务
如果需要使用 crontab 设置定时备份,需要和 qshell 一样配置环境变量
根据你所使用的 bash 锁对于的配置文件的不同,写入位置也不一样
如果是/bin/bash,那么就是/.bashrc 文件,如果是/bin/zsh,那么就是/.zshrc 文件中。
写入的内容为
1 | #/后面为放ossutil64的文件夹的路径 |
然后可以通过两种方式立即生效,其一为输入 source ~/.zshrc 或者 source ~/.bashrc 来使配置立即生效或者完全关闭命令行,然后重新打开一个即可,接下来就可以在任何位置使用 qshell 命令了。
设置完$PATH 以后,corntab 定时任务的代码为
1 | #每周一上传一次,如需更改时间,参考前面的crontab设置 |
总结
Bitwarden 作为一个开源密码管理软件,有良好的跨平台支持,而且费用也比 1Password 便宜。